
Thinline Stratocaster
Semi-hollow Electric guitar
Year: 2025
Client: Me
This guitar was a pure passion project. Something I took on for the love of working with my hands, whether that’s on cars or in the shop. I set out to build a thinline Stratocaster with a semi-hollow body and f-hole, starting from a pre-cut body but taking full ownership of the process from there. I handled all the sanding, filling, sealing, painting, and relic work, finishing it in nitrocellulose to keep it lightweight and allow it to age naturally over time. I wired everything myself using Xotic 60s pickups for the tone I was after, soldering and assembling all the components. Along the way, I also refined the neck pocket with careful sanding to get a tight, precise fit. Making sure every detail felt right both visually and in hand.


Sand, Fill, and Seal
Since I got the body pretty rough and raw, I spent a lot of time doing multiple rounds of sanding and filling. My goal was to make it as flat as possible so a lot if time was spent with filling in even the smallest pores. I would later use the glossy wood cellulose sealer to get a better look using the relections. Once I got it close is when I dove into painting the body.


Paint and More Sanding
Once I got everything ready, I did my first layer of paint. I used Nitrocellulose because I like the way it ages and rubs off over time. With the first pass of paint, I could see I missed several spots in the wood that needed to be filled so I sanded some of the paint off to fill.
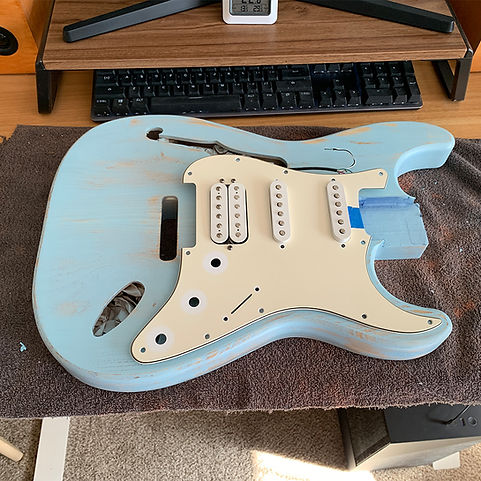

Test Fit and Trying Paint Relicing
During the filling phase, I took the time to double check the fitment of the electronics as well as trying to test out relicing. Relicing is the process where you make the guitar look older than it really is.

Took Relicing Too Far
With the first try, I took off way too much paint and not it gave it a look I wasnt looking for. Something I wish I had done, was stain the wood to look older and dry so when I did remove the paint, it would look more realistic. I also test fit the neck which I added some extra relicing to as well and realized it didnt fit. So I enlarged the pocket before painting again.
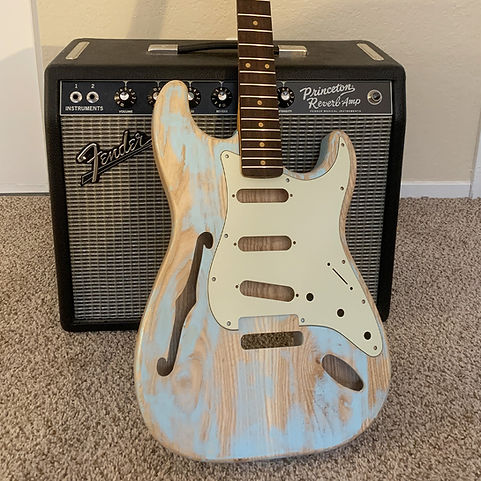

Refine Relic Job
After overdoing the relic look, I decided to go for a subtle relic. In the process, I learned that to get a good relic look, you have to craft a story for the guitar. Who used is and how? Where did they touch the most? For me is was a sitting guitar player so I only removed paint along the fillets where a belt, jeans, and a shirt would rub on.


Shielding and Wiring
Once everything was ready, I went ahead and added copper tape shielding to the bottom of the pick guard and wired the pickups in a traditional stratocaster configuration. I used some no load pots on my tone knobs to get a little extra volume when I turn everything to 10.

Putting It All Together
In the end, I enjoyed the process since I do not wood work and paint often, so it was a refreshing experience. For my next one, I will be doing it from scratch and possibly be doing it more by hand like the used to before CNCs were used to make electric guitars.